Change the DNS Server Settings on Android phones and tablets
Android DNS settings, or Domain Name System settings, are responsible for translating domain names (such as https://www.google.com/) into IP addresses (such as 8.8.8.8). By changing your Android DNS settings, you can improve your browsing speed, security, and privacy.
Benefits of changing your Android DNS settings:
- Improved browsing speed: Some DNS providers have a larger network of servers than your ISP, which can lead to faster browsing speeds.
- Improved security: Some DNS providers offer security features such as DNS over TLS (DoT) or DNS over HTTPS (DoH). This can encrypt your DNS queries and protect them from eavesdropping.
- Improved privacy: Some DNS providers do not log your DNS queries. This can help to protect your privacy online.
- Access to blocked content: Some DNS providers can help you to access content that is blocked by your ISP or government.
- Parental controls: Some DNS providers offer parental controls and content blocking features. This can help to protect your children from harmful content.
In addition to these general benefits, changing your DNS settings on Android can also help to improve the performance of specific apps and services. For example, using a DNS provider that supports DNS over TLS (DoT) or DNS over HTTPS (DoH) can improve the security and privacy of your online banking and shopping.
Overall, changing your DNS settings on Android is a quick and easy way to improve your browsing speed, security, privacy, and access to content.
How to Change Your Android Private DNS Settings?
To change your DNS settings on Android, follow these steps:
- Open the Settings app.
- Tap Network & Internet.
- Tap Advanced.
- Tap Private DNS.
- Select Private DNS provider hostname.
- Enter the hostname of the DNS provider you want to use.
- Tap Save.
Depending on which Android version you have, these instructions may be more useful:
How to change to a private DNS Service setting on Android?
These instructions to change the DNS server on Android will vary based on the version of Android you have.
- Swipe down on the home screen of your Android device
- Tap Settings, then Tap Connections.
- Touch Wi-Fi on the menu. The screen shown below appears, listing all of the Wi-Fi networks your phone is able to discover.
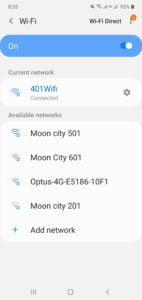
- Touch the gear icon to the right of the network you’re connected to.

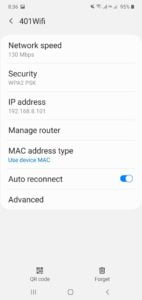
- Touch on Advanced or View More
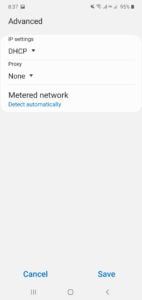
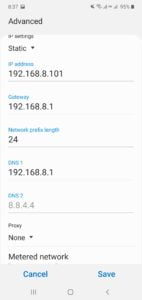
- To change the DNS, Touch on IP settings, you need to change the IP settings from DHCP to Static. Then the IP Settings page will open.
Don’t worry about the editing the IP address as the Android device will fill in the IP address it has acquired through DHCP. Add our DNS resolvers (208.67.222.222 and 208.67.220.220) to the entries for DNS 1 and DNS 2 as shown below:
Here is a list of some popular DNS providers and their IP addresses:
| DNS Provider | Primary DNS Server IP | Secondary DNS Server IP |
|---|---|---|
| Google DNS | 8.8.8.8 | 8.8.4.4 |
| Cloudflare DNS | 1.1.1.1 | 1.0.0.1 |
| Quad9 DNS | 9.9.9.9 | 149.112.112.112 |
| OpenDNS | 208.67.222.222 | 208.67.220.220 |
| AdGuard DNS | 94.140.14.14 | 94.140.15.15 |
| CleanBrowsing DNS | 185.228.168.9 | 185.228.169.9 |
| Verisign DNS | 64.6.64.6 | 64.6.65.6 |
| Level 3 DNS | 4.2.2.1 | 4.2.2.2 |
| Oracle Dyn DNS | 216.146.145.36 | 216.146.145.37 |
| UncensoredDNS | 114.114.114.114 | 114.114.114.115 |
| NextDNS | 45.90.28.190 | 45.90.28.191 |
| NordVPN DNS | 103.86.96.100 | 103.86.96.101 |
You can use these IP addresses to manually configure your DNS settings on your computer or network device. However, it is generally easier to use the hostname of the DNS provider (such as dns.google) instead of the IP address. In addition to selecting a primary DNS service, it is advisable to select an alternate DNS server or secondary DNS server. Having primary and secondary DNS servers set up can help avoid problems.
When choosing a DNS provider, it is important to consider your needs and preferences. For example, if you are looking for a DNS provider that offers improved browsing speed, you may want to choose a DNS provider that has a large network of servers around the world. If you are looking for a DNS provider that offers security and privacy features, you may want to choose a DNS provider that offers DNS over TLS (DoT) or DNS over HTTPS (DoH).
Comparison of different DNS providers, including their features, pricing, and performance:
| DNS Provider | Features | Pricing | Performance |
|---|---|---|---|
| Google DNS | Free, DNS over TLS/HTTPS, parental controls | Free | Good |
| Cloudflare DNS | Free, DNS over TLS/HTTPS, malware blocking, family safety | Free | Good |
| Quad9 DNS | Free, DNS over TLS/HTTPS, malware blocking, parental controls | Free | Good |
| OpenDNS | Free, DNS over TLS/HTTPS, malware blocking, parental controls | Free | Good |
| AdGuard DNS | Free, DNS over TLS/HTTPS, ad blocking, malware blocking, parental controls | Free | Good |
| CleanBrowsing DNS | Free, DNS over TLS/HTTPS, malware blocking, family safety | Free | Good |
| Verisign DNS | Free, DNS over TLS/HTTPS | Free | Good |
| Level 3 DNS | Free, DNS over TLS/HTTPS | Free | Good |
| Oracle Dyn DNS | Free and paid plans, DNS over TLS/HTTPS, malware blocking, parental controls | Free and paid plans | Good |
| UncensoredDNS | Free, DNS over TLS/HTTPS, malware blocking | Free | Good |
| NextDNS | Free and paid plans, DNS over TLS/HTTPS, ad blocking, malware blocking, parental controls | Free and paid plans | Good |
| NordVPN DNS | Free, DNS over TLS/HTTPS, malware blocking | Free | Good |
Features:
- DNS over TLS/HTTPS: This encrypts your DNS queries and protects them from eavesdropping.
- Parental controls: This allows you to block certain websites and content from your children.
- Malware blocking: This blocks websites and domains that are known to be malicious.
- Ad blocking: This blocks ads from being displayed on websites.
Pricing:
Most DNS providers offer free plans. Some DNS providers also offer paid plans with additional features, such as more advanced parental controls and ad blocking.
Performance:
All of the DNS providers listed above offer good performance. However, some DNS providers may have faster speeds in certain regions than others.
Which DNS provider is right for you?
The best DNS provider for you will depend on your needs and preferences. If you are looking for a DNS provider that offers a variety of features, such as DNS over TLS/HTTPS, parental controls, and malware blocking, you may want to choose a DNS provider such as Google DNS, Cloudflare DNS, or Quad9 DNS. If you are looking for a DNS provider that offers the fastest speeds in your region, you may want to try out different DNS providers to see which one works best for you.
You can also try using a DNS benchmark tool to compare the performance of different DNS providers. DNS benchmark tools measure the speed and reliability of different DNS providers.
How to Optimize Your Private Android DNS Settings?
Once you have changed your DNS settings, you can optimize them for even better performance. Here are a few tips:
- Use a DNS provider that offers DNS over TLS (DoT) or DNS over HTTPS (DoH). This will encrypt your DNS queries and protect them from eavesdropping.
- Use a DNS provider that has a large network of servers around the world. This will help to improve your browsing speed.
- Use a DNS provider that offers parental controls and content blocking features. This can help to protect your children from harmful content.
Additional tips for changing your DNS server on Android:
- Use a DNS provider that offers a variety of features, such as improved browsing speed, security, privacy, parental controls, and content blocking.
- Choose a DNS provider that has a large network of servers around the world.
- Select an alternate DNS server if the option is available.
- If you are using a VPN, make sure that the DNS settings of your VPN are configured correctly.
- If you are having problems with your DNS settings, try restarting your device or clearing your cache.
Common problems and solutions for changing your Android DNS Settings:
Problem: I can’t access the internet after changing my DNS settings.
Solution: Try restarting your device. If that doesn’t work, try changing your DNS settings back to the default settings. You can also try using a different DNS provider.
Problem: I’m having trouble connecting to certain websites after changing my DNS settings.
Solution: Try clearing your browser’s cache and cookies. If that doesn’t work, try changing your DNS settings back to the default settings. You can also try using a different DNS provider.
Problem: I’m not sure which DNS provider to use.
Solution: There are many different DNS providers available, each with its own features and benefits. Some popular DNS providers include Google DNS, Cloudflare DNS, and Quad9 DNS. You can try out different DNS providers to see which one works best for you.
Problem: I’m having trouble changing my DNS settings on my Android device.
Solution: The steps for changing your DNS settings may vary depending on your Android device and the version of Android you are using. However, the general steps are as follows:
- Open the Settings app.
- Touch Network & Internet.
- Touch Advanced.
- Touch Private DNS.
- Select Private DNS provider hostname.
- Enter the hostname of the DNS provider you want to use.
- Touch Save.
Frequently asked questions and answers for changing your Android DNS Settings:
What are DNS settings?
DNS settings, or Domain Name System settings, are responsible for translating domain names (such as https://www.google.com/) into IP addresses (such as 8.8.8.8).
Why should I change my DNS settings?
There are a few reasons why you might want to change your DNS settings:
- Improved browsing speed: Some DNS providers have a larger network of servers than your ISP, which can lead to faster browsing speeds.
- Improved security: Some DNS providers offer security features such as DNS over TLS (DoT) or DNS over HTTPS (DoH). This can encrypt your DNS queries and protect them from eavesdropping.
- Improved privacy: Some DNS providers do not log your DNS queries. This can help to protect your privacy online.
- Access to blocked content: Some DNS providers can help you to access content that is blocked by your ISP or government.
- Parental controls: Some DNS providers offer parental controls and content blocking features. This can help to protect your children from harmful content.
Which DNS provider should I use?
There are many different DNS providers available, each with its own features and benefits. Some popular DNS providers include Google DNS, Cloudflare DNS, and Quad9 DNS. You can try out different DNS providers to see which one works best for you.
I’m having trouble changing my DNS settings. What should I do?
If you are having trouble changing your DNS settings, you can try the following:
- Make sure that you are entering the correct hostname of the DNS provider you want to use.
- If you are using a VPN, make sure that the DNS settings of your VPN are configured correctly.
- Try restarting your device or clearing your cache.
Conclusion
Changing and optimizing your DNS settings on Android is a quick and easy way to improve your browsing speed, security, and privacy. By following the tips above, you can make the most of your Android device.
How to setup a static IP address on Android phones or tablets.
